Platform Not Supported Exception was unhandled (Console Application)

Exception:ย An unhandled exception of type ‘System.PlatformNotSupportedException’ occurred.

Description:ย Microsoft SharePoint is not supported in 32-bit process. Please verify that you are running in a 64-bit executable.

Note: Exception occurs while executing code in console application.

1

Resolution: Follow below steps to resolve this exception.

Step 1: Go to Project Settings.1

Step 2: Click on Build โ€“> Platform Target from Any CPU to x64.1

Step 3: Now save and close the current file, thenย try again to execute the console application by pressing F5 and your exception would be resolved.

Thanks for giving the specious time to read this blog. Click on like button if this blog helped you in any way or give your valuable comments for the betterment.. ๐Ÿ™‚


Create SharePoint Web Application using Server Object Model

Introduction: Hi Guys, Today I would like to take this opportunity to let you know about how you can Create New SharePoint 2013 Web Application using SharePoint Server Object Model (SSOM). To achieve this you have to follow below steps:
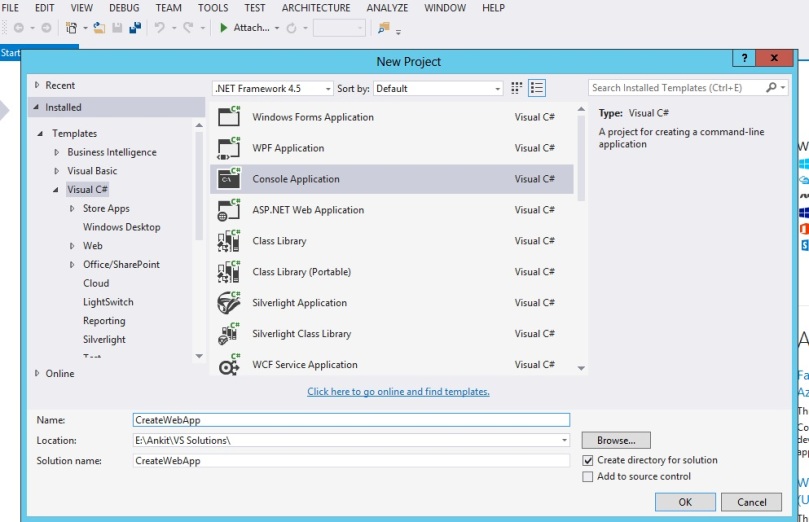
Step 1: Go to SharePoint Server โ€“> Open Visual Studio โ€“> Click on New Project โ€“> Create console Application and name it whatever you want.

1

Step 2: Add reference to Microsoft.SharePoint and add using Microsoft.SharePoint;ย and using Microsoft.SharePoint.Administration; namespace at the top of Program.cs file.

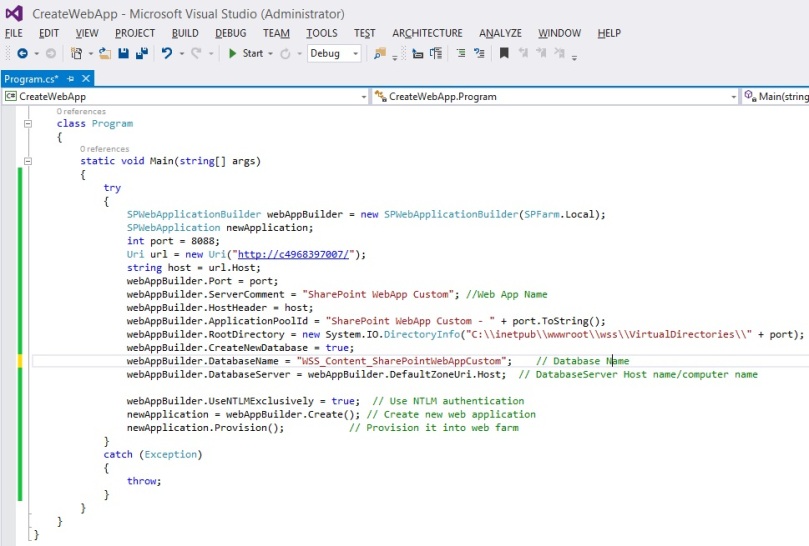
Step 3: write the below code inside Main function.

try
 {
 SPWebApplicationBuilder webAppBuilder = new SPWebApplicationBuilder(SPFarm.Local);
 SPWebApplication newApplication;
 int port = 8088;
 Uri url = new Uri("http://servername/");
 string host = url.Host;
 webAppBuilder.Port = port;
 webAppBuilder.ServerComment = "SharePoint WebApp Custom"; //Web App Name
 webAppBuilder.HostHeader = host;
 webAppBuilder.ApplicationPoolId = "SharePoint WebApp Custom - " + port.ToString();
 webAppBuilder.RootDirectory = new System.IO.DirectoryInfo("C:\\inetpub\\wwwroot\\wss\\VirtualDirectories\\" + port);
 webAppBuilder.CreateNewDatabase = true;
 webAppBuilder.DatabaseName = "WSS_Content_SharePointWebAppCustom"; // Database Name
 webAppBuilder.DatabaseServer = webAppBuilder.DefaultZoneUri.Host; // DatabaseServer Host name/computer name

webAppBuilder.UseNTLMExclusively = true; // Use NTLM authentication
 newApplication = webAppBuilder.Create(); // Create new web application
 newApplication.Provision(); // Provision it into web farm 
 }
 catch (Exception)
 {
 throw;
 }

1.jpg

Step 4: Execute the console application by pressing F5.

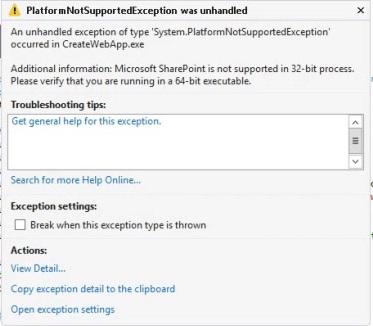
Note: If you get any exception while executing your app, click here to preform certain steps to overcome from this.

Platform Not Supported Exception was unhandled.

Microsoft SharePoint is not supported in 32-bit process. Please verify that you are running in a 64-bit executable.

Step 5: Now try again to execute the console application by pressing F5.

1.jpg

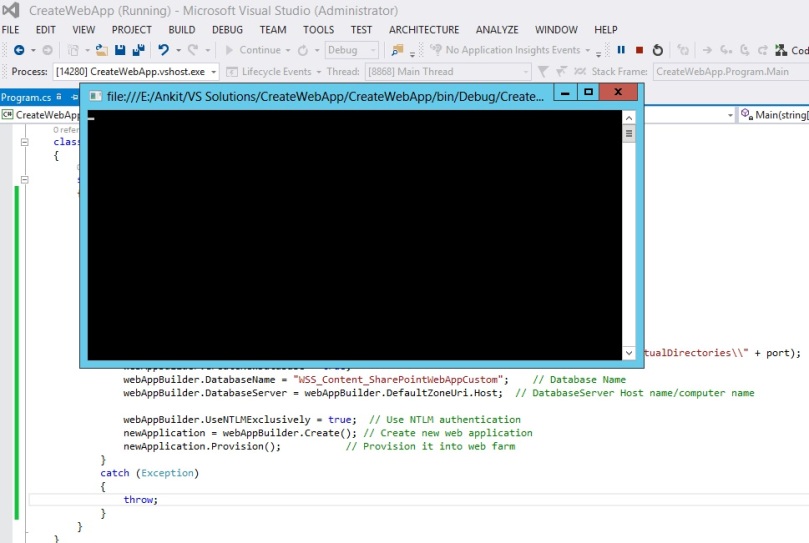
Note: This will take some time to complete and create your Web Application. So wait until it gets completed.

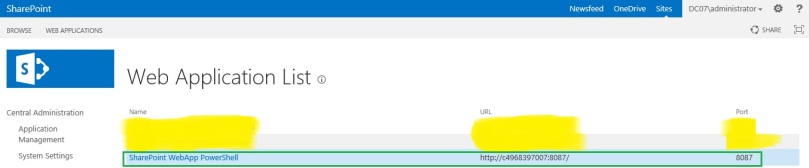
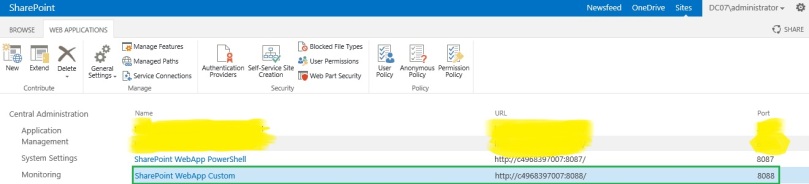
Step 6: To check whether your Web application has been created or not, Go to SharePoint Central Administrator โ€“> Click on Manage Web Application. You will find the newly created web application here.

1

Related post:

Create SharePoint Web Application using Powershell

Thanks for giving the specious time to read this blog. Click on like button if this blog helped you in any way or give your valuable comments for the betterment.. ๐Ÿ™‚

Create SharePoint Web Application using Powershell

Introduction: Hi Guys, Today I would like to take this opportunity to let you know about how you can Create New SharePoint 2013 Web Application using SharePoint Management Shell (PowerShell). To achieve this you have to follow below steps:

Step 1: Go to SharePoint Server.

Step 2: Open Notepad and write below command to create new Web App:

Add-PSSnapin Microsoft.SharePoint.PowerShell
# Web Application Name
$Name = “SharePoint WebApp PowerShell”
# Server Name
$HostHeader = “ServerName”
# Port Number
$Port = “8087”
# Load-balanced URL
$url = http://Servername/”
# Content database Name
$ContentDBName = “WSS_Content_SharePointWebAppPowerShell”
# ApplicationPool Name in IIS
$AppPoolName = “SharePoint WebApp PowerShell – 8087”
# Applicatio Account
$AppPoolAccount = “Domain\AppPoolAccount”
# Path of App Pool
$RootPath = “C:\inetpub\wwwroot\wss\VirtualDirectories\”

$ap = New-SPAuthenticationProvider -UseWindowsIntegratedAuthentication -DisableKerberos

# Command for Creating new Sharepoint WebApplication
New-SPWebApplication -Name $Name -Port $Port -HostHeader $HostHeader -URL $url -ApplicationPool $AppPoolName -ApplicationPoolAccount (Get-SPManagedAccount $AppPoolAccount) -DatabaseName $ContentDBName -AuthenticationProvider $ap

Now save the file with extension “.ps1”. In my case I have saved the file with the name CreateWebApp.ps1ย at locationย “E:\Ankit\Powershell“. Your file should be look like below:

1

Step 3: Run SharePoint Management Shell as Administrator and navigate to the path where your CreateWebApp.ps1 file is located (i.e. E:\Ankit\Powershell, in my case).

1

Step 4: Write the below command and click enter.

.\CreateWebApp.ps1

1

Note: This will take some time to complete and create new Web Application.

Step 5: To check whether your Web application has been created or not, Go to SharePoint Central Administrator –> Click on Manage Web Application. You will find the newly created web application here.

1

Related Post:

Create SharePoint Web Application using Server Object Model

Thanks for giving the specious time to read this blog. Click on like button if this blog helped you in any way or give your valuable comments for the betterment.. ๐Ÿ™‚

Change “SharePoint” text at the Top Left of SharePoint 2013 Ribbon

Introduction: In SharePoint 2013 you may have seen the text “SharePoint” at the top left corner of blue Ribbon. You can change this by setting the web application’s SuiteBarBrandingElementHtml property using Windows PowerShell.

1

This change will affect all the sites within the Web Application you choose and yes, you will see the changes on the site administration page as well.

There are three ways you might consider when replacing the SharePoint text on the blue Ribbon bar.

  1. Change SharePoint text only
  2. Change SharePoint text and link it
  3. Replace SharePoint text with logo and link it

So to achieve this you have to follow some steps:

Step 1: Go to SharePoint Server –> Find and Run Windows PowerShell as Administrator.

1

Step 2: Write the below script and execute. you can change it as per your wish.

i) Change SharePoint text only

1

1

1

ii) Change SharePoint text and link it

1

1

1

iii) Replace SharePoint text with logo and link it

1

1

1

Reference:ย Change SharePoint 2013 Title

Thanks for giving the specious time to read this blog. Click on like button if this blog helped you in any way or give your valuable comments for the betterment.. ๐Ÿ™‚

Display the hidden SharePoint List/Library in Site Content

Introduction: Hi guys, In my previous post I have given you the detailed idea about how you can Hide SharePoint List/Library from Site Content.
Now if you want to make visible the hidden list/library again, you can do this using SharePoint Designer.

In this demo, I will display the hidden list Custom List 1 by following the some steps:

Before:

1

After:

1

Step 1: Open SharePoint Designer.

1

Step 2: Open Site and give the URL of the site. This will ask your credentials so you have to put your credentials.

Step 3: Click on All Files on the left menu and it may take some time. Your SP designer would be looking like below:

1

Step 4: Click on Lists –> you can see all your lists here –> Right Click on the list you want to show in browser and click on Properties. In this demo list name is Custom List 1.

1

Step 5: Uncheck the box Hide from Browser and save this.

1

Step 6: Now go back to your SharePoint Site โ€“> Go to Site Content and you will see that the list with name Custom List 1 is visible again.

1

For your reference: Hide SharePoint List/Library from Site Content

Thanks for giving the specious time to read this blog. Click on like button if this blog helped you in any way or give your valuable comments for the betterment.. ๐Ÿ™‚